I have a gaming closet.
10.17.2010
I enjoy getting things organized. I do. Not just for the sake of doing it - I tend to try to organize things in a useful way, or I at least like to believe it's useful. That's what led me to my latest organizational task. I've got lots of gaming crap stuff. Lots. I like collecting games, mainly because I like reading rules and seeing how somebody can make up a world (or city, or battle) with rules that both make sense and are hopefully balanced. Over the past few years I've started getting into miniatures-based games, and with those types of games come lots of little components to keep track of. I've stored various parts of all the games here and there throughout the house, but it was getting hard to find something once I started looking for it. Enter my mad organizational skillz.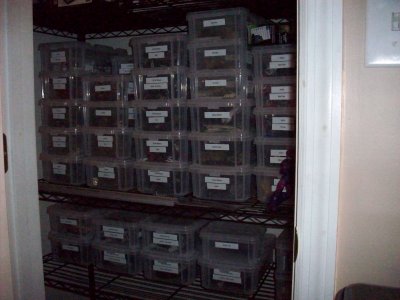
Now in my closet I have roughly 35 shoebox sized nicely labeled containers of playing pieces for:
- Heroscape
- Axis & Allies Miniatures (stored by faction)
- Axis & Allies War at Sea
- Star Wars Miniatures (stored by faction)
- Star Wars Starship Battles (stored by faction)
- ActionClix - Halo
- HeroClix
- Battletech/MechClix
- Battlefield Evolution (I think I was the only person that ever heard of this one)
Yes, that's a lot of crap stuff. I didn't even know I had ¼ of it. Now that it's divvied up I not only know I have it, but it's easier and faster to get to a specific piece for playing. Theoretically.
I still need to work on making sure I have all the rulesets - Wizards didn't renew their Star Wars License this year, so they're no longer hosting a copy of the rules on their website. I didn't see a copy of the War at Sea rules, so I'll have to make sure to download a copy (I'm pretty sure that should be up on the Wizards site).
Permalink
boardgames renovation/remodelling
Pics, yes, PICS!
05.21.2010
I haven't posted any non-Warcraft pictures since February. What a boring blog this must be... I'll have to cram different families of pictures into this post to make up for it.
Pictures Part I: Orange Beach
2 weeks ago I took Gina down to the beach. Here's proof!


Pictures Part II: Kitchen
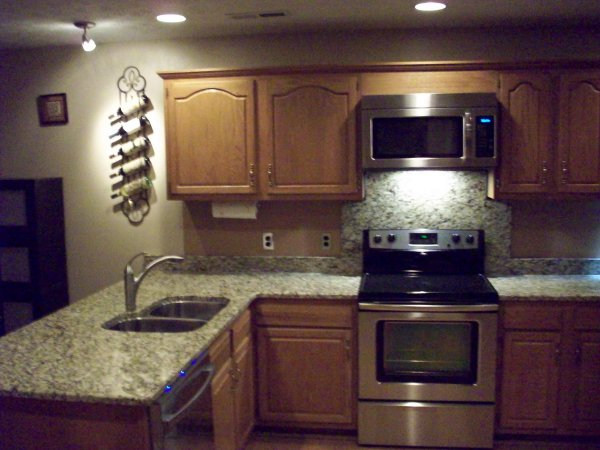
The big thing waiting for me upon my arrival back home from the above beach was this year's home renovations. Last year was redoing the master bedroom and turning what was then "the junk room" into the spare closet that all the chicks envy. Once again I called Handyman Mike to come do all the work, and since I had the above vacation planned out he decided that would be the best time to do the renovating. I like work being done to the house when I'm gone - it minimizes the mess I have to live through.
In years past I've had some little thing for Mike to fix (last year I think it was something to do with the kitchen ceiling) and then we throw in something for fun. This year nothing was broken, but I made up for it with what all I ended up getting done. The first part, the "must do" item, was to replace the kitchen counter top. The counter top was green, which matched back when there was white and green linoleum in the kitchen and dining area, but that left years ago. It was time to complete my grown-up-ness and update the kitchen. After talking with Mike we added in that this would be the time to replace the appliances if I was going to do it, so that got added in. Mike also likes to play with lighting, so of course we had to redo the lighting! 


Pictures Part III: Patio/Landscaping
The patio from 2 years ago also needed some landscaping. I wasn't using it because there was just nothing out there. I had gone by Lowes and picked up some furniture, plus I put together the hammock & stand Gina got me for Christmas last year. I had suggested to Mike that we put in a rock border around the fence - mainly to keep me from tearing up the PVC fence posts with the weed eater.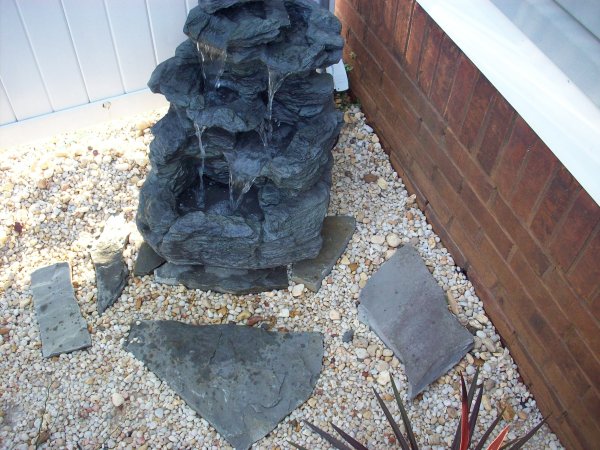
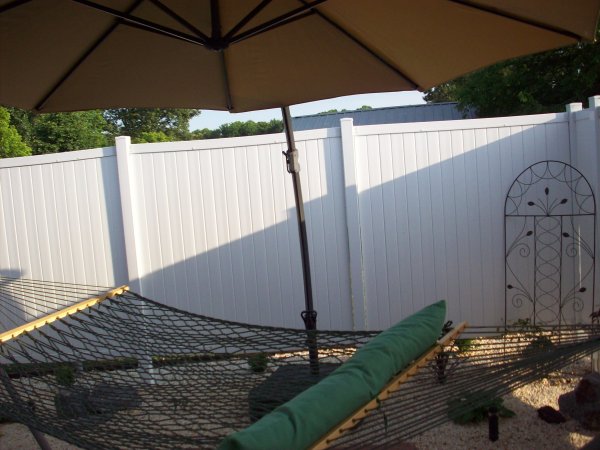


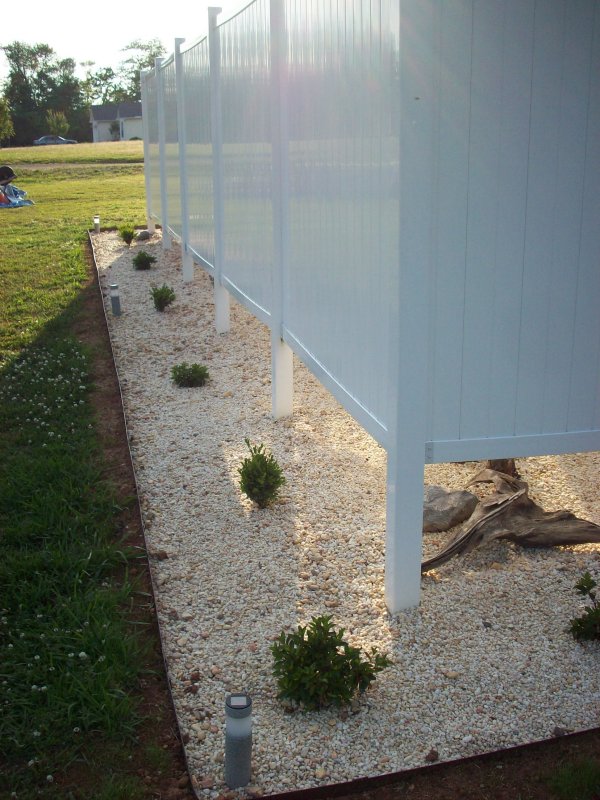


Obviously we got a little carried away from "rock border". It's a nice spot to go lay in the hammock and read a book though.
Permalink
renovation/remodelling road trip
The Jim Puckett Pre-Memorial Wall
07.05.2009
Last year, Jim (or really, Jim's better half, but I'm writing this so I can make little changes along the way) took it upon himself to apply a little texture painting to an accent wall in his Arizona home. I thought it looked cool, and I thought about it more than a heterosexual man should. I came to think that one day I too would have a suede textured accent wall in my Alabama home one day.
Enter Mike the handy man and all the work I was getting done while I was on vacation in Jamaica. I've already mentioned the Super Walk-In Closet which was, in part, to cover up the disaster of me trying to learn how to paint. After 10 years, the master bedroom was in dire need of a fresh coat of paint, so while Mike was installing laminate flooring I was going to get him to paint the room. At the last minute, I sprung Jim's suede paint idea.
"I got an idea" I told Mike. "If we make this wall kind of an accent wall with the suede paint, and then I can mount a TV up here on the wall. It'll look cool!" Mike agreed. I told him that since this was a last-minute addition (I was leaving the next morning for my trip), that if he couldn't get the texture painting done it would be ok.
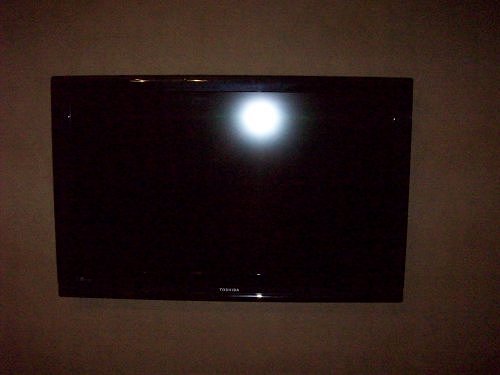
A week later I came home and found I had a cool accent wall! This lead me to browse the Memorial Day sales to find a TV to mount on the wall, thus giving me an excuse to get rid of the 27", 200lb behemoth that I moved here from Mom's 10 years ago. I found a TV (a 40" 1080p Toshiba). Next I started getting cables and wall plates.
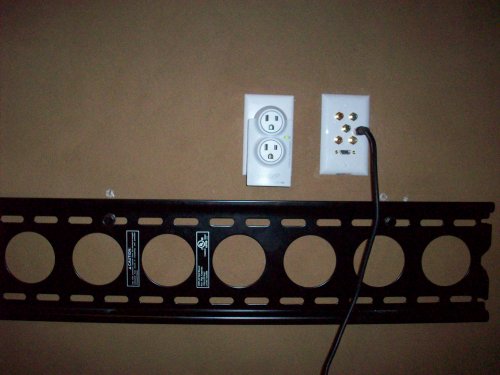
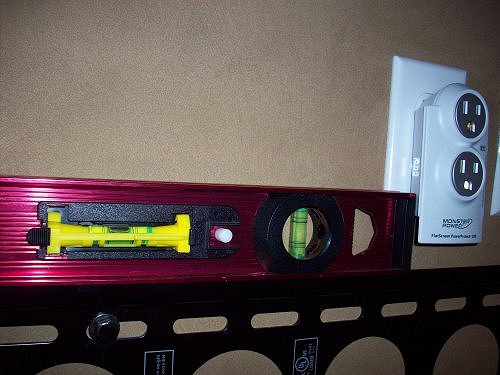
Mike had put an electrical outlet and cable outlet about eye level where the TV would be mounted. This would keep cables from being seen - one of those cool factors I was wanting. I could have a DVD player in a small entertainment center below the TV, and using the old cable outlet I could run the necessary wires in the wall. The TV and DVD player would only be (maybe) 5 feet apart, but this way there would be no visible cables. Plus, this would keep the wall from being too covered up.
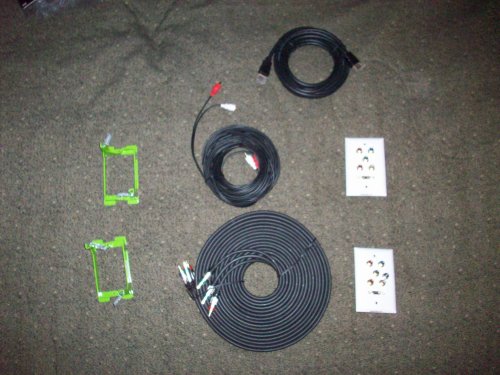
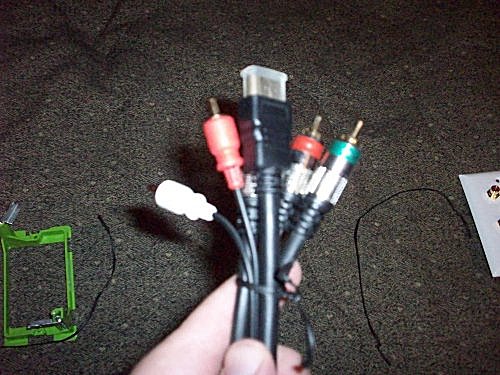
Planning a little bit ahead, I scoured the interweb for wall plates with the appropriate connectors. My current, albeit old, DVD player has RGB component outputs, so I looked for the digital component video and audio, along with co-ax for the cable TV, and HDMI for the Blu-Ray that I know I'll be getting before the end of the year. I looked for 2 weeks and found out nobody makes that combination.
The most connections I could find on any wall plate was 6. I needed one with component video (3 connections) and audio (2 connections), co-ax (1 connection), and HDMI (1 connection). I had 1 too many. Crap. I decided to leave off the co-ax. I could have gotten a 2nd wall plate and cut another hole in the wall, but I didn't want to mar the wall more than I had to. After I thought about it for a bit, I decided I could poke a hole in a wall plate and run the co-ax through myself. I may not know how to paint, but years of model making taught me how to bore a hole in a piece of plastic.
Now that I decided on wall plates it was time to get some cable. Locally cables cost way too much, so I opted for the Amazon solution. 12ft HDMI cable at Best Buy? $80+ if they have it. On Amazon: $4. Soon I had all the cables I needed shipped discreetly to my house.
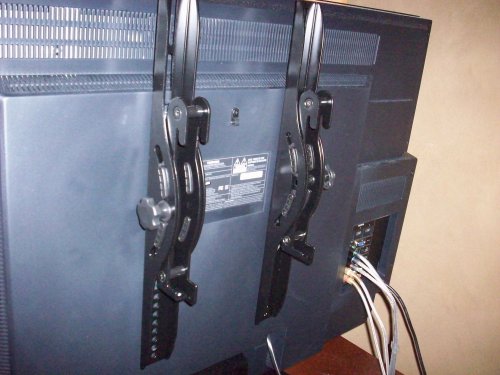
When I bought the TV I also bought a universal mounting kit for the proper size TV. I had all the parts sitting at home for a couple of weeks before I hunkered down and mounted the TV. Looking at the directions, this looked to be a 1-man job that would take about 20 minutes.
The first thing I had to do was rip out the existing wall boxes. They didn't have enough of an opening to run the cables I needed. The first one was easy to take out since it was on Mike had put in earlier. The other one was put in when the house was built and had what looked to be 8" nails holding it in the stud. I needed tools! A quick trip to Lowe's later and I had some proper prying utensils along with the right replacement wall boxes.
Once the wall boxes were replaced it was time to run cable in the wall. Although this really was the easiest part, I learned one of the problems of buying things on the interweb. It's easy to get caught up buying bargains and not realize what you really need. Case in point: I needed cable to run roughly 6 feet. Since it was so cheap, I ended up getting:
- HDMI Cable: 12 ft
- RGB Video Cable: 25 Ft (I noticed 9ft at Lowes is $20. I think I paid $12 on Amazon).
- RCA Audio Cable: 50 ft (it was only $4!)
It took some cramming, but I got all of that cable shoved in the wall.
Next I took out the mounting kit and read through the instructions one more time. I needed to find the studs behind the wall, mark the right height, level things, and drill 6 holes. I held up the mount and saw that eye-level seemed to be about the right height, just underneath the new electrical and cable outlets. I got out my stud finder/laser level. I'm not sure why, but only 2 studs were in range of the width for the mount. Hmmm, that's odd. Anyway, I marked where the holes should go with the 2 studs I found and got out my drill.
My drill can drill through drywall. Once it hits wood it doesn't penetrate worth crap.
I've had that drill, a cordless drill, for at least 5 years. I might have used it once. I had charged the battery for a couple of hours, but a combination of the battery and the drill just not having enough torque was going to keep me from finishing this project tonight. This calls for a trip to Wal-Mart and the corded drill aisle!
20 minutes later, I've got a drill plugged into the wall and I'm making holes!
I'm drilling holes in the wall and tightening bolts into the studs when I notice just how close the mount is to the bottom of the wall plates. I had gotten a surge protector to mount behind the TV, and I wasn't sure how much room it needed. I plugged the surge protector in, and quickly found it needed another ½ inch. Dammit.
I unscrewed the bolts and marked spots about an inch lower. On drilling the 2nd hole, I managed to catch the side of the stud and felt the drill sheer off a little. To not want to mess up the wall, I was now looking at 5 extra holes! I stepped back, took a couple of breaths, and went back to work. Eventually I got the mount up and attached the TV. The mount on the TV is adjustable as fat as viewing angle, but the brackets are so far in I'll never be able to get to them to adjust it (one of the wonders of "universal").
2½ hours later, my 20 minute job was finished. It's not quite as nice as I had hoped, but if you don't look too close you'll never know. That suede paint sure is nice though.


Permalink
renovation/remodelling
I'm not gay, but...
06.10.2009
Way back in August of 2004, I tried to learn how to paint in one of my spare bedrooms (not the master bedroom and not the computer room). It didn't go well. By the time I claimed I was finished, there was paint on the walls, in many places you could see where the runs in the paint had tried. There was paint on the door frames. There was paint on the window frames. There was paint on the ceiling. Even though I had used old sheets as drop cloths, there was paint on the gray carpet. For the majority of the past 5 years I haven't gone into that room more than to toss some crap in or go digging through the crap looking for something I had tossed in. One of my goals of this year was to fix that room to make it usable. I even had an idea for how to make it super-usable!
Over a couple of weeks I started to accumulate the tools I would need to prep the room for painting. Masking tape, various sanding implements to get rid of those dried up runs in the wall, etc. One weekend day I found myself with some free time and noticed most of the other things on my chore list were marked off, so I set out to prep the room! I grabbed some sandpaper and started sanding a run on the wall. And I sanded. For a long time. A long, long time. The run never really went away.
It didn't take long before I decided that while I originally thought this was a job for me to learn how to paint properly while fixing my past mistakes, it was really a job for my to call handy man Mike and get him to fix it. I called him up, showed him the disaster I needed fixed, then I went off to Jamaica for a week. When I got back, the disaster was fixed. Walls were painted. Ceiling was painted in the proper places. Carpet had been replaced with the laminate flooring I have in the rest of the house. I believe I've learned my lesson - whenever I get the urge to paint, call Mike.
I had been thinking for a while of what to do with that room. Most people have a spare bedroom for visiting guests. I don't have visiting guests, so setting up a proper bedroom would be a waste of space. I had originally (when I first painted the disaster) thought of turning the room into a small library - bookshelves, a chair to read in, cozy lighting - but how often do I just sit around and read?
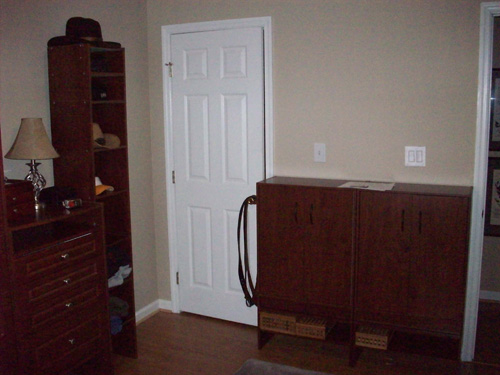
One thing I've discovered, or maybe just admitted, over the past year is that I'm a clothes horse. When I find clothes in my size, I tend to buy the regardless of whether or not I really need another blue polo shirt. My closet is stuffed with clothes. Plus, my big-n-tall clothes takes up loads more room than most people's normal sized clothes. I hang most of my clothes, but it seems they were all crammed into the closet hanging up. Grab one hanger and pull out 3 others when you take a shirt out. It was here that I realized I could make my disaster room into a closet. I big honking closet!
Closetmaid makes closet furniture, cool furniture you see on tv shows with fancy walk-in closets. I had gotten a couple of units from Lowes/Home Depot about 2 years ago and set them up in the bedroom to replace my old dresser. The Closetmaid units are modular/stackable pre-fab kits, so I'm all about putting them together. By the time Mike fixed the disaster room, all I really needed where some hanging rods and I would be in business.
Over the course of a week I moved furniture into my new closet. I made a couple of trips to Lowes/Home Depot to fill in some missing gaps. I found that Closetmaid no longer makes the furniture I have, although Sauder makes something similar. I replaced my amalgamation of multicolored Wal-Mart plastic hangers with cool-looking wooden hangers. Overall, I think it turned out pretty good.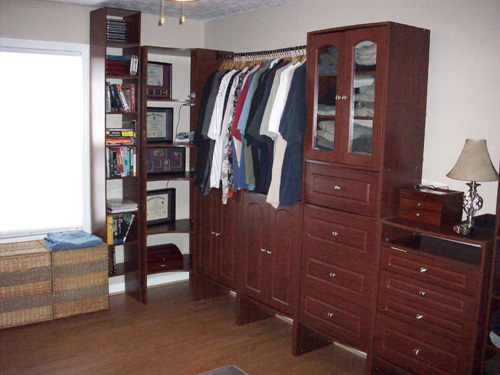
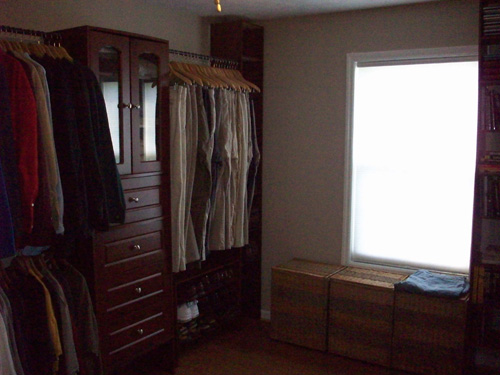

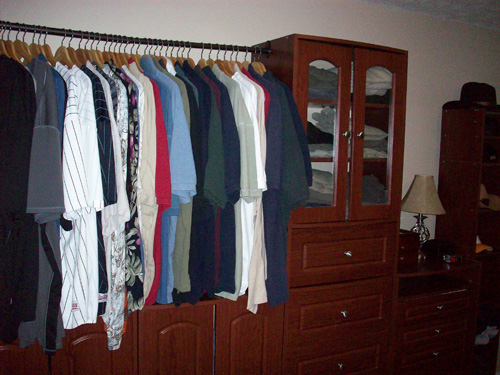
So far I'm the envy of every girl that's seen it :)
Permalink
renovation/remodelling
Updated Man Cave!
03.16.2009
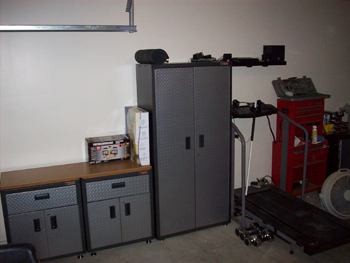
Part of my goal of cleaning/updating the house over the past year has been to better organize things. I'm a little anal about knowing where things are, so being organized is important. When I got the storage building in the back yard late last year, it became the oversized closet for most of the stuff that was being stored in the garage. I then found myself able to once again park in the garage!
It's amazing how fast a 16x10 storage building can fill up. I guess I shouldn't be surprised since the garage is supposedly 20x20. I had a collection of Rubbermaid storage closets and shelving units that lined the walls of the garage that found themselves lining the walls of the storage building. At least half the stuff out there I probably don't need - at least 1 storage closet is full of unopened wrestling and superhero figures. But that's what a storage building is for. Storage!
I still keep the treadmill in the garage - it's electric and the storage building out back doesn't have electricity, so it makes sense to keep it in the garage. The riding mower, which I had planned to keep parked in the storage building, is staying in the garage just because it'll be a pain to roll it up into the building. Looking to the future, and since the mower and treadmill take up some wall space, I thought I would go ahead and cover up some available wall space with shelves.
This time, instead of Rubbermaid, I opted for actual metal (by Whirlpool, for some reason). I got 2 short cabinets which are covered by a single top constructed out of some indestructible space-age polymer, along with a taller cabinet. The taller cabinet currently has gaming supplies (like my Dwarven forge booty!). The shorter cabinets are empty. For now. That's why this project has been part of a plan for future expansion.
Maybe it's time for more Dwarven Forge booty?
Blog Archive
As always, correct spelling is optional in any blog entry. Keep in mind that any links more than a year old may not be active, especially the ones pointing back to Russellmania (I like to move things around!).
Tags have been added to posts back to 2005. There may be an occasional old blog that gets added to the tag list, but in reality what could be noteworthy from that far back?
Blog Tags
3D Printer (27)
4ground (32)
4ground-mall (40)
5PFH (1)
action figures/toys (10)
airbrush (7)
Aliens (1)
Amazon (12)
antenocitisworkshop (11)
Atlas O Gauge (2)
Batman Miniature Game (2)
Battletech (1)
belt sander (12)
Blood Bowl (4)
boardgames (77)
books/comics (19)
computers hate me (5)
conveyances (15)
Cyberpunk Red Zone (3)
diet (53)
dreams (7)
fallout (1)
feng shui (1)
Firefight (1)
Foundry (3)
Gale Force Nine (1)
game dev (23)
gaming miniatures (237)
gaslands (10)
gastric sleeve (34)
Green Stuff World (2)
Hasslefree (9)
Hero Forge (1)
hobbies (102)
Jailbirds Minis (2)
kevin smith (1)
Knight Models (2)
malifaux (3)
Marvel Crisis Protocol (2)
mckays (1)
models (11)
mom (32)
moon light (5)
movies/tv/dvd (60)
Necromunda (4)
ninja division (1)
Pathfinder Deepcuts (1)
pilonidal cyst (5)
plastcraft (2)
programming/interweb (41)
rambling (60)
random (367)
random maintenance (3)
Reaper Bones (3)
reaper chronoscape (32)
renovation/remodelling (25)
road trip (27)
salesforce (1)
sarissa precission (2)
scenery (19)
Star Trek (2)
Star Trek Away Missions (3)
Star Wars Legion (1)
studio miniatures (3)
ttcombat (12)
video games (51)
vs Factions(PDFs) (1)
walking dead (36)
wargame foundry (3)
work (6)
wrestling (45)
zombicide (2)
Zombicide Invader (19)
zombie mall (23)