2 More Houses With Garbage Pickup
05.08.2018
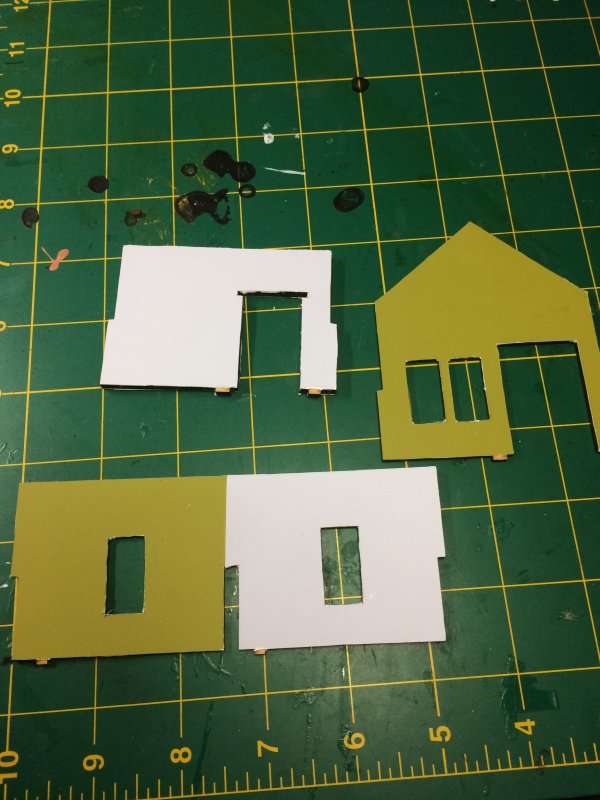
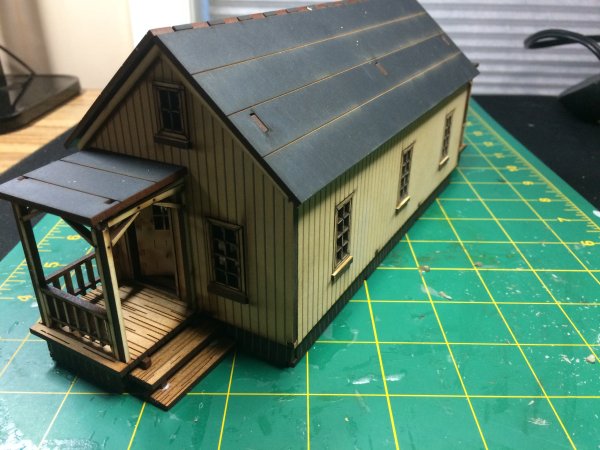
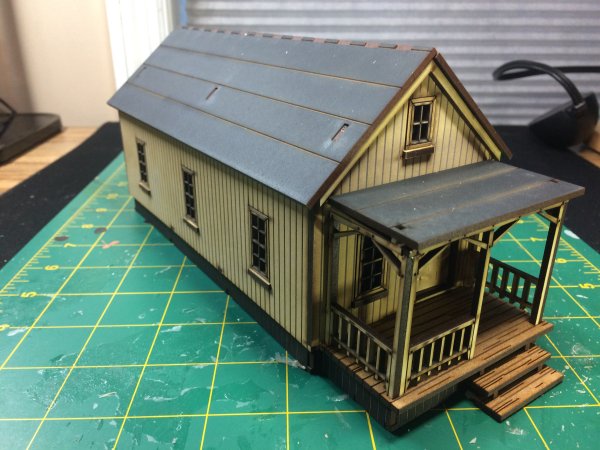
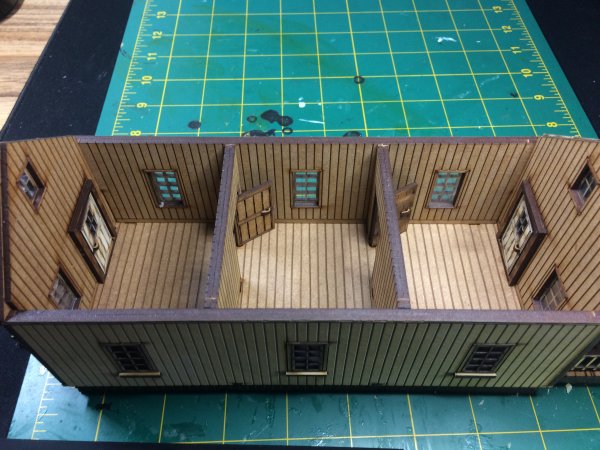
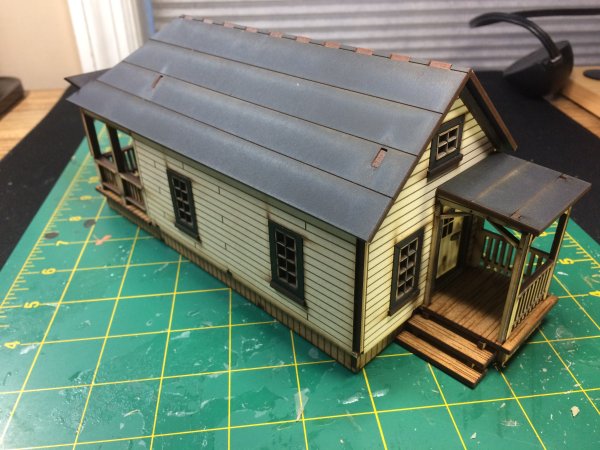
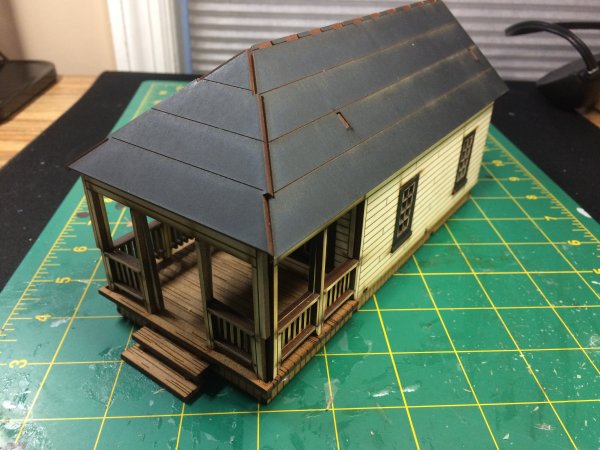
After the failed attempts of the last blog I went back to the well with something I was confident I could do without too much trouble. I still had 2 4Ground Shotgun Houses on the shelf, along with some TTCombat clutter that I'd primed a while back. I'd made one of the Shotgun Houses before so my confidence was high!
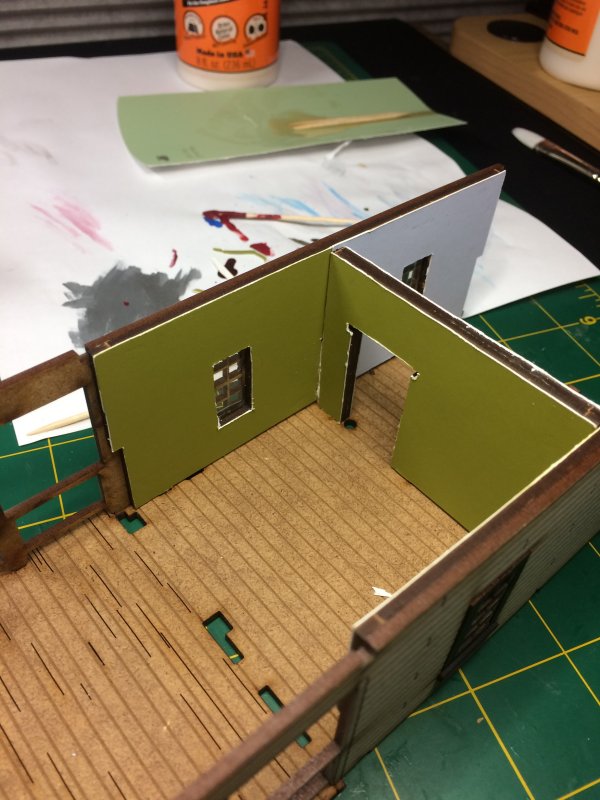
Last time for the house interior I printed off some wallpaper textures. While that worked well enough, I wanted to try something a little better. I stopped by Home Depot and went to the home paint section... and got lots of paint sample cards. Instead of printing my own, why not try actual paint colors? Most of the cards had too much print on them to be usable, but the Behr sample cards were perfect. In fact, 1 card would cover the vaulted/arched ceiling end wall without any problem.
I still glued some transparency paper between the walls to act as window glass. It's so subtle you can't see it unless you're looking for it, but I like knowing it's there. One of the things I learned from my first go around was to cut the window openings after the paper has glued and dried. In addition, although it was easy to fold back the paper from openings and cut flush with a razor blade, folding back left a lot of white (internal) paper after the cut. Still cutting with a razor, but without folding and just trying to stay flush to the wall/opening helped cut back on that. It still seems to be an affect of cutting this way though.
There's only 1 thing I screwed up on the houses. Well, 1 that I've noticed so far. When gluing exterior doors into the frames, I stuck them so the exterior of the doors face inside. After doing this on the first house I was extra careful to not do the same thing for the second house. So careful that I did exactly the same thing, but this time with great care and precision. At least I got the right side of the roof facing out this time.
Shotgun House C had etched walls to look like paneling, so I eschewed covering them with paper and instead the the easy route of There That's Good Enough.
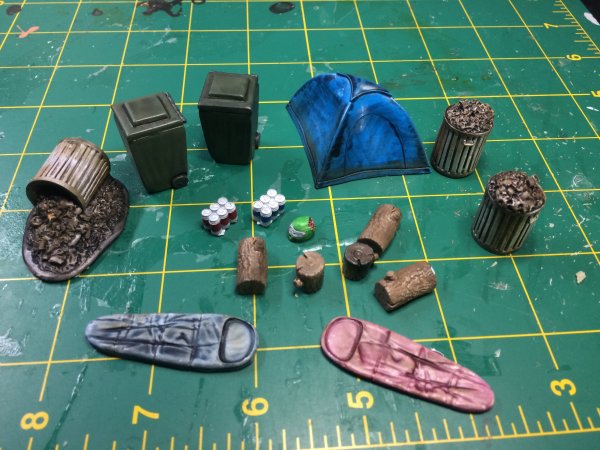
The TTCombat clutter came from a set of garbage (I honestly don't remember what it's called) and cmaping equipment. The garbage set I got for the wheeled garbage bins - my houses need scheduled garbage pickup! The camping set I picked up to pad my order for the coupon I had, plus I had some other camping bits that would fit with it if needed later on. There's post-accident motorcycle helmet that looks like it's supposed to still have a head in it. That should fit in well with my zombie apocalypse.
Next up. I'm not completely sure. I have 2 versions of water towers in progress, but I'm not feeling confident the end result will be keepable. The TTCombat convenience store or coffee shop are the next buildings in the queue. A few Reaper Chronoscape minis will likely get primed by the weekend for when the painting mood strikes. There's also that 3D printer still waiting to be unboxed.
There's also been an addition to the mini painting backlog.
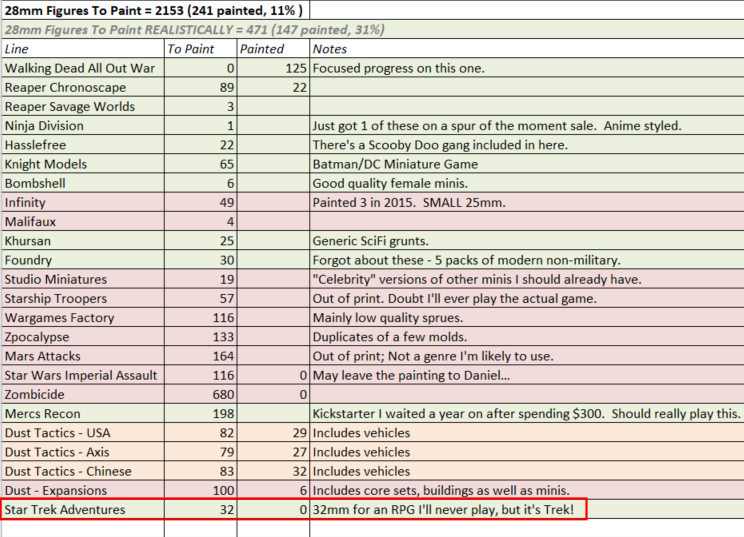
Adding in 32 Trek figures, for a game I likely won't play AND won't fit into any other game, isn't the smartest thing to do. Smart hasn't been something I'm oft accused of when it comes to either spending money or (not) get minis/toys/games.
Permalink
4ground gaming miniatures hobbies ttcombat
I got a thing
04.30.2018
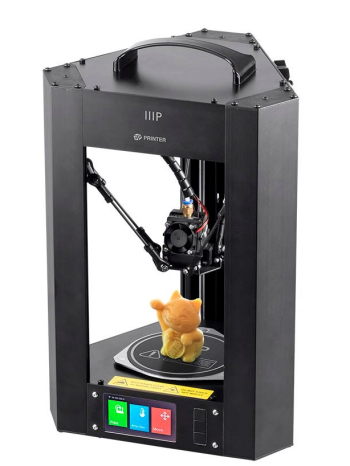
Thanks to a little peer pressure, a low price, alleged low maintenance, and peer pressure (did I mention peer pressure?), I got a 3D printer.
I ordered it Thursday and it arrived today. Filament from Amazon will get here Thursday. I have plenty of stuff to print.
I can't believe I bought a frickin 3D printer after telling myself I wasn't going to do it for years. Now I'm worried about that laser cutter I said I was never going to get, too.
Suffering From The Game Pimp Hand
04.28.2018
One of the joys of pimping out my games with scenery, or even trying to make print and play games a little snazzier, is that it's an excuse to break out the arts & crafts skills that I never fully developed as a child, but found I enjoy more and more as I get older. Plus, mom as all about the arts and crafts, so doing it makes me smile. I've yet to make anything perfectly right for any of the gaming stuff I'm played around with and made over the past couple of years. Well, ever, but I've been trying to actively do a better job the past couple of years. Most of the time I'm about to screw something up and along the way of fixing it, come up with something that will work - battle damage and weathering are great for covering up mistakes from little to big.
Sometimes, there's no weathering or battle damage to fall back on.
- The Gaslands Track Travesty
I've been moving forward with wanting to play Gaslands. I can't just print movement templates and start playing with cars on a table top. Hell no! The first thing I need is a map to play on. While I have a few roads for my zombie-infested streets, those streets are of the wrong scale for my needs. Enter Dave via RPGNow and his Wasteland Dirt Track. Although I love a modular map, I really like the layout of Dave's track. I liked it enough I bought it at full price - which I seldom do at RPGNow since they have almost as many sales as Steam. The map is scaled for Hot Wheels (1/64), but I've decided to play at a smaller scale of 1/87. Luckily, this is as easy as printing 1/64 at 73%.
Since this isn't a modular board, my plan was to print out the track at home and glue it to foam board. It's well documented that cutting a straight line isn't my strong suit. I ended up printing 25 7.5" square sections to glue onto 2 foam boards I would fit together. I couldn't find 1 foam board big enough at Hobby Lobby, unfortunately. With everything printed out, I used Aileens Stick Tack on the foam board, applied and lined up my printed and cut piece of track, and moved on the next square.
Once everything dried, it was unusable. The foam board had bowed up on the edges, thanks to the glue drying and contracting. When I held 1 end of the board flush to the table, the opposite end was curved up about 2½" above the table. Weighting the board down for 2 days didn't make a noticable difference.
Every other time I've glued onto foam board I've used smaller sections (8" instead of 30"), different glue (Elmers, or even spray adhesive), and usually card stock paper instead of the regular stuff I printed on. There's enough things to do differently, and I never thought about the board bowing up screwing me on this one, that I don't yet know what Plan B is.
- The Custom Dice Decal Debacle
#2 on the Make Gaslands Cool is custom dice. There's a nice chart to map dice numbers to the 6 symbols on the dice. You can fairly easily print out the dice, fold, glue, and have your own dice. We don't roll that way here, though!
I came across a video showing Mod Podge Photo Transfer goop. Laser print something, apply goop, stick it on thing to transfer to, come back a day later with a moist cloth and rub the paper away, leaving the laser ink (I know there's a better name, but I like the way it sounds). This sounds better than the ink jet waterslide decals I've had mixed luck with in the past. I wanted to try this method to make some Gaslands dice!
Back at Hobby Lobby, I picked up a bag of ¾" wooden cubes. I wanted to test this out on something my meaty fingers could easily manipulate. I printed out the dice icons from the Gaslands site, cut them, applied the Podge to 1 side of 1 cube to sample, and a day later rubbed it with a moist cloth. The videos I'd seen had people transferring family photos to wood, and I was basically doing the same. When I rubbed the paper off, the icon showed fine, but it also had a white background. For whatever reason, my paper didn't rub all the way off. Still, it looked fine, so I'll go ahead and do the other dice.
I proceeded to cut and apply 6 faces to 6 die. I allowed some proper drying time between each face just so I wouldn't move around a recently applied piece of paper while trying to apply another side - which ended up being at least 4 hours per side. At the end of the weekend I moistened a washcloth and began rubbing the paper off. Everything looked ok, but a little off. I could tell the paper wasn't coming off uniformly. Some of the videos showed going over with the moist rag multiple times. On the final die I decided to be a little more agressive, and ended up rubbing the paper, with the printed icon, all the way off.
It appears I'd not transferred a photo, but merely found an overly complicated way to paste paper to a wooden cube.
In tracking down the cause of this one, I think it's because my paper wasn't 100% laser printer compatible. It's marked for use in ink jet or laser, adn I noticed I could actually feel a little texture on some of the printings. While my oversized wooden cube dice are usable, they're not really worth moving forward with. It'd be better to just make some clear label stickers to put on blank dice.
- The Dremel Disaster
For my slowest evolving project - the water tower - I decided to move forward on a test version where I can learn some stuff. Paper mache style paper covering of styrofoam is the big hurdle here. What most kids learn while getting their hands sticky with water and glu in the 4th grade I skipped.
My test water tower needs legs to rais it above ground. &frag12;" square dowels will work! I simple square, 4-legged base is all I need. It owuld be easier if the legs were joined together by cross-supports and just let the tower kind of sit on top. The dowels were about a yard long, and I decided the legs would be 8". I could cut 4 legs and use the left over for 1" cross supports.
The last time I cut dowels they were small enough I could use some razor shears (again, not sure what they're really called, but it's a 5 inch razor blade attached to glorified scissor handles).Said shears did not work on these dowels. I got out the dremel and attached the wood cutting blade. 8" lengths were cut, then I went to cut 1" sections from the remainder. While the wood cutting blade works great, the body of the dremel was in the way of making a straight cut. In the end, I had 4 lengths for legs that I could even out at the same length, and 10 meant-to-be 1" lengths that were jagged and nowhere near each other.
My dremel is not good for fine cutting. In the end, I went back to Hobby Lobby and bought a bag of ½" cubes to glue together as needed.
- The Custom Template Consumer Conundrum
I've made scaled down movement templates for Gaslands. I attempted to make oversized dice. On the Friends of Gaslands page, people are linked to that sell customized whatnot for the game, and many make movement templates. 1 guy, who I don't want to name here, had a nice selection of colored acryllic templates. He also sold a set of dice that looked of pretty good quality. I contacted him and asked if he could make a scaled down (73%) version of the templates. We emailed back and forth a hand full of times as it seemed each time I answered a question it led to another legitimate question. After getting what felt like all the info he needed from me to put together a quote, I didn't hear anything back. Maybe I had too many questions? Maybe I came across as flaky (at least 1 of my answers led to not being able to use semi-transparent acryllic). Maybe the cost isn't worth the hassle?
While I could easily email him back, I've mostly convinced myself it's not worth moving forward on. at least not now. Later on I'll start thinking about getting a home CNC setup like Christian. I may have also spent too much time looking at YouTube videos of home laser cutters and acryllic - which require way too much tweaking for my attention to detail.
For now, though, my little cardstock-on-really-thin-chipboard templates will do. I went ahead and made left-turn versions to go with the right-turns instead of just flipping them over.
- The Spray Paint Overspray Sprain
Hoping to salvage a little something along the way, I decided to prep the garbage cans and camping set I got off an eBay sale from TTCombat a while back. I haven't painted anything in over a month, and trash scenery shouldn't be too hard. First up, some cut wood which just needed a base coat of tan.
I then learned what happens when that cheap damn Krylon, that I said I wasn't going to use anymore, is more empty than it first felt. First, there's a hiss and spew as compressed air tries to shoot out some paint. Next, a mostly liquid stream glops out. My cut wood now has the equivalent of maybe 6 coats of paint.
I've since trashed what was screwed up or stored away what I'll attempt to fix later. Time to go back to something more structured and get back into my groove. I have two more shotgun houses to make, sitting on a shelf. The first one was a good learning experience that wasn't too frustrating. I have an idea on how to make the 2nd pass better.
Permalink
gaming miniatures gaslands hobbies
Paintless Game Prep
04.15.2018

Since reaching my milestone of painting all of the Walking Dead Minis I had, and the resulting game thereafter, I proceeded to vanish. Ok, not really vanish, but as far as any productive hobbying,
it was nil. I had a list - things to prep, spaces to prep to make room for prepping those things, and my favorite: getting things needed to prep with. I managed to put off most of it. Fine, all of it.
I might do a little prep-prep (prepping for the prep work?) here and there, but nothing ever really got done. Last weekend was going to be my big push forward and finally make some progress on my list!
Instead, I was hopped up on Sudafed and hoping I wouldn't have a full fledged sinus cold - I didn't have such, but I did spend a Saturday in bed/on the couch with 3 naps before 10 hrs of sleep.
So this was the weekend I would make progress! And, I did!
I don't have a lot to show for it, but that's the nature of prep-prep. The garage is now cleaned to the point I can once again use
it. I have all the supplies for my home-made (looks like a) water tower project. As shown in the pic above, I've printed and cut out the templates for the 1/87 version of Gaslands.
That sounds pitiful now that I've read it back. I need to make more progress-progress.
Permalink
boardgames gaming miniatures gaslands
Mandatory Pic-less Random Update: The NAS Chronicles
03.25.2018
After the picture-fest of the last post of the Walking Dead game, I feel obligated to balance it out with a non-gaming photo-free post. So with that...
Stupid Netgear NAS enclosures!
In 2009, I bought a 4 bay NAS to use random hard drives I just couldn't find myself willing to part with. I set up whichever RAID level maximizes disk space and enjoyed
the thrills of having too much disk space. 2½ years later the enclosure died, and I learned that the RAID striping used was somehow proprietary to where only another ReadyGear NAS would read the drives I had RAIDed. Like everybody
else, I don't back anything up. So I got 4-bay enclosure by the same company. Once I got the drives accessible again, I set up the NAS to RAID things differently. The 1st 2
drives were mirrored with stuff that's just a pin to track down again but seldom used, the next 2 drives were mirrored with important, day-to-day stuff. Last year I moved to laptop(s) only at home, so having networked drives for the
important stuff was actually kind of handy. Plus, they're mirrored! If 1 drive goes bad I can always stick in another. Right?
Last week, during tornadic activity where I got a little rain, there was enough of a brownout to flip the house GFI circuits. In a coincidence, RAID-1 drive #2 (with the unimportant, just hard to track down again data), was flashing a warning.
Looks like I have a drive going bad. I'll order a replacement as it is unimportant. Being trained in the ways of PCs since the 90's (fine, 80's), I decided to reboot the NAS just in
case that would magically fix it - maybe the brownout just skewed a sensor setting. Reboot away! After reboot, I found that my problem of 1 bad drive of unimportant data...
... had just gotten a lot worse. Now the 2, extremely important, mirror RAIDed drives (because what are the chances 2 drives will go bad) were showing up as dead.
Well. Shit.
I removed the drives from the NAS and rebooted it again. I felt a little better (just stay with me) since after reboot the NAS system was still reporting 3 bad drives, yet only 1 drive
was plugged in. Odds are good my data was still in there. With my 1 (unimportant) drive still recognized, I started transferring the data off to one of the bajillion USB hard drives I've got
laying around. What followed for the next 3 hours was trying, very unsuccessfully, to get data off the other drives without using the NAS. Things I learned include, but are not limited to:
- The NAS uses a Linux RAID
- Plug a Linux RAID into a Win10 laptop via USB and it doesn't care nor recognize anything is there at all (and no handy tool to do so)
- Plug a Linux RAID into a Mac Yosemite 10.10 via USB, go to the command line and mount the drive. Get confirmation it's mounted. It's not mounted. It says it is, but I can't access anything on the drive.
- There are plenty of tools and tricks to loading Linux on a USB stick, and/or plugging the drives into the motherboard, but I didn't have a desktop to pull the case apart to mess with this.
That last bullet was Plan D, or whatever next-to-the-last plan letter I needed. Once the unimportant drive was copied off, I was going to try switching an important disk to the 1 recognized
functioning bay. The plan after that would be to order another ReadyGear NAS from Amazon, copy my crap off, and then return it and never buy anything with "Ready"Anything in the name. Luckily,
the plan of using the 1 working bay worked. Over the course of 2 days, data got copied off. Right now, I have a NAS with 1 functioning bay, 9 hard drives of 1.5-2.0 TB (that's a story for another
time), and a USB hard drive cradle sitting in a box "in case I need any of it". All of the important data is spread among 3 USB hard drive + my most used laptop.
I still have a NAS drive. I got a Seagate drive (which they no longer sell the 8TB version I picked up) 2 years ago. I was using this to
store media files. Files I don't really access that often. Of the important files that were rescued, a handful truly are important but only updated every once in a while (budget files, tax stuff, etc).
While Googling "how to get data off a RAID disk on Windows" I came across some pretty good instructions for backing up modified files on Windows. Every other time I've made Windows backups I could never
get the file to restore. After my adventure over the past week, I think it's time to try again. If I use a NAS to store the backup, and the backup can be restored, that should cover my Important Files
scenario. Hopefully.
I like the "here's what I painted" posts better. Keeps my blood pressure from racing.
Blog Archive
As always, correct spelling is optional in any blog entry. Keep in mind that any links more than a year old may not be active, especially the ones pointing back to Russellmania (I like to move things around!).
Tags have been added to posts back to 2005. There may be an occasional old blog that gets added to the tag list, but in reality what could be noteworthy from that far back?
Blog Tags
3D Printer (26)
4ground (32)
4ground-mall (40)
action figures/toys (10)
airbrush (7)
Aliens (1)
Amazon (12)
antenocitisworkshop (11)
Atlas O Gauge (2)
Batman Miniature Game (2)
Battletech (1)
belt sander (12)
Blood Bowl (4)
boardgames (77)
books/comics (19)
computers hate me (5)
conveyances (15)
diet (53)
dreams (7)
fallout (1)
Foundry (3)
Gale Force Nine (1)
game dev (22)
gaming miniatures (227)
gaslands (10)
gastric sleeve (34)
Green Stuff World (2)
Hasslefree (9)
Hero Forge (1)
hobbies (101)
Jailbirds Minis (1)
kevin smith (1)
Knight Models (2)
malifaux (2)
Marvel Crisis Protocol (2)
mckays (1)
models (9)
mom (32)
moon light (5)
movies/tv/dvd (60)
ninja division (1)
Pathfinder Deepcuts (1)
pilonidal cyst (5)
plastcraft (2)
programming/interweb (41)
rambling (60)
random (365)
random maintenance (3)
Reaper Bones (3)
reaper chronoscape (32)
renovation/remodelling (24)
road trip (26)
salesforce (1)
sarissa precission (2)
scenery (16)
studio miniatures (3)
ttcombat (12)
video games (51)
walking dead (36)
wargame foundry (3)
work (6)
wrestling (45)
zombicide (1)
Zombicide Invader (19)
zombie mall (23)